
Imagine it’s 4:45 PM on a Friday. Your boss just walked over and said, “Can you get me the weekly sales summary before you leave?” You have 15 minutes and 3,000 rows of messy data waiting for you.
If you’ve been there – and honestly, most of us have – you already know the panic. Manual formatting, copy-pasting between sheets, generating a PDF, and firing off an email. It takes an hour minimum.
That same task? I’ve seen it done in under 90 seconds with a single button click using Excel VBA automation examples exactly like the ones in this post.
VBA, or Visual Basic for Applications, is Microsoft Excel’s built-in programming language. It lets you write instructions – called macros – that Excel runs automatically. No advanced coding degree required. Just a willingness to learn the basics and a genuine desire to stop doing the same things over and over by hand.
In this guide, I’m walking you through 10 real, working VBA automation examples – the kind that actually come up in office settings. Each one includes the full code, a line-by-line breakdown in plain English, and the exact scenario where it helps most. If you’re looking for a deeper foundation first, check out our deep-dive guide on Excel VBA automation.
Key Takeaways
- VBA macros can automate data formatting, report generation, PDF exports, and even Outlook emails – all from Excel
- Each macro runs in the VBA Editor (open it with Alt + F11) and saves as an
.xlsmfile - Line-by-line code explanations make these examples approachable even for complete beginners
- Best practices like error handling and testing on copies protect your data
- These 10 examples cover the most common time-draining tasks in American corporate offices
Setting Up Your VBA Environment
Before we get to the actual automation examples, you need to know how to access and use the VBA editor. It’s easier than it sounds.
Step 1: Press Alt + F11 in any Excel file. This opens the Visual Basic Editor.
Step 2: In the left pane (called the Project Explorer), right-click on your workbook name → click Insert → Module.
Step 3: You’ll see a blank white code window. This is where all your VBA code goes.
Step 4: Paste any of the code examples from this post into that module.
Step 5: Press F5 to run the macro, or go back to Excel, click the Developer tab → Macros, select your macro name, and click Run.
One more thing: always save your file as an .xlsm (macro-enabled workbook). A regular .xlsx file strips out all VBA code when you save.
💡 Pro Tip: If you don’t see the Developer tab in your ribbon, go to File → Options → Customize Ribbon and check the box next to “Developer.”
Example 1: Auto-Format Raw Data
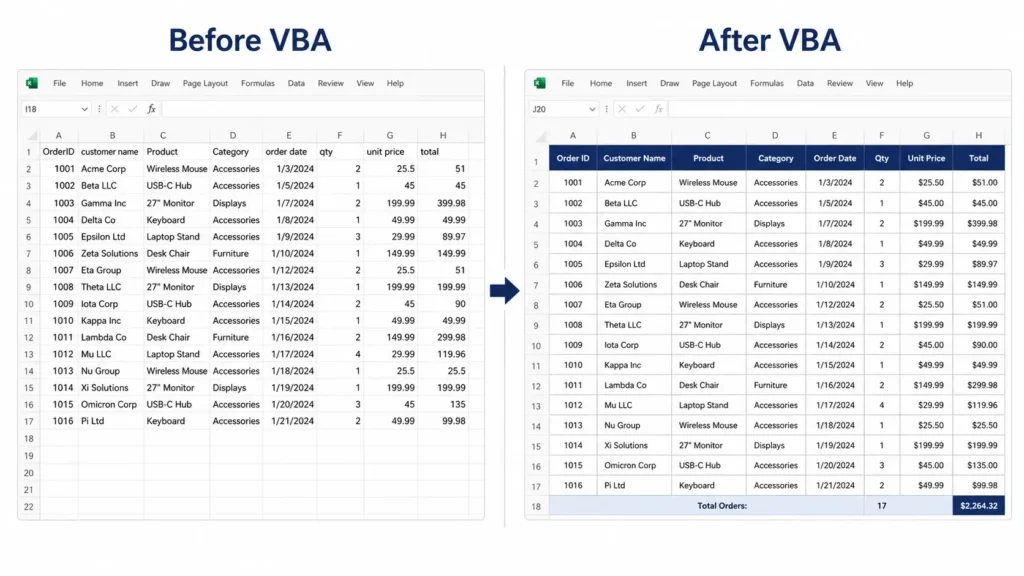
The Scenario: You pull a weekly sales report from your company’s database. It dumps into Excel looking like a hot mess – inconsistent column widths, no header formatting, numbers stored as text. You used to spend 20 minutes cleaning it up. Not anymore.
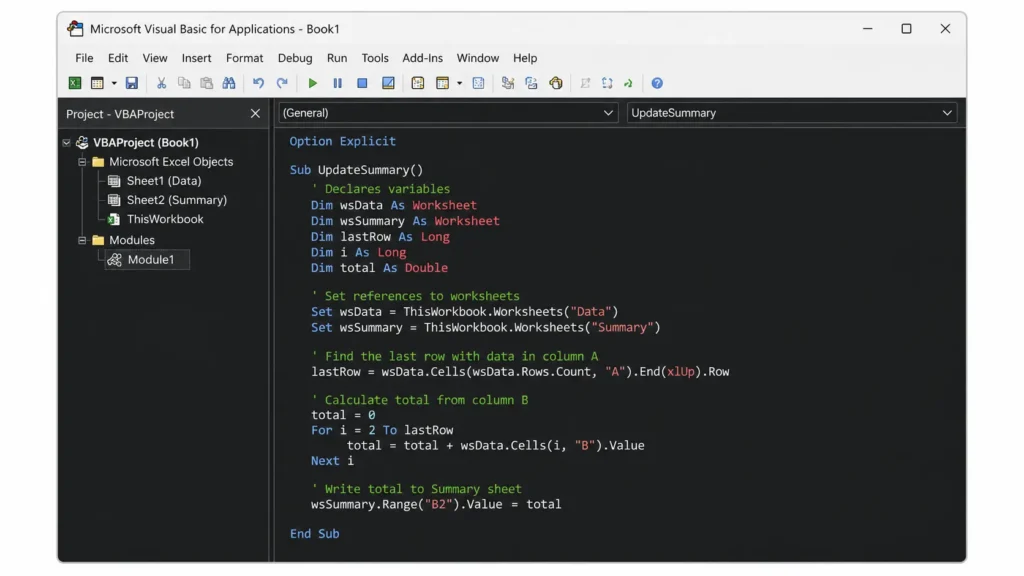
Sub FormatRawData()
    ' Turn off screen flicker for speed
    Application.ScreenUpdating = False

    Dim ws As Worksheet
    Set ws = ActiveSheet

    ' Step 1: Auto-fit all column widths
    ws.Cells.EntireColumn.AutoFit

    ' Step 2: Bold the header row and change its background color
    With ws.Rows(1)
        .Font.Bold = True
        .Interior.Color = RGB(31, 73, 125)   ' Dark navy blue
        .Font.Color = RGB(255, 255, 255)      ' White text
    End With

    ' Step 3: Apply a border to all data cells
    Dim lastRow As Long
    Dim lastCol As Long
    lastRow = ws.Cells(ws.Rows.Count, 1).End(xlUp).Row
    lastCol = ws.Cells(1, ws.Columns.Count).End(xlToLeft).Column

    ws.Range(ws.Cells(1, 1), ws.Cells(lastRow, lastCol)).Borders.LineStyle = xlContinuous

    ' Step 4: Format column A as text-to-date if needed (optional - adjust as needed)
    ' ws.Columns("A").NumberFormat = "mm/dd/yyyy"

    ' Re-enable screen updates
    Application.ScreenUpdating = True

    MsgBox "Formatting complete!", vbInformation
End Sub
Line-by-Line Explanation:
Application.ScreenUpdating = False– Stops Excel from visually redrawing every change. Makes the macro run faster and look cleaner.Set ws = ActiveSheet– Assigns the currently active sheet to a variable calledwsso we can reference it throughout.ws.Cells.EntireColumn.AutoFit– Automatically resizes every column to fit its content.- The
With ws.Rows(1)block bolds row 1 (your headers) and applies a navy background with white text. RGB(31, 73, 125)is a specific shade of navy blue. You can swap those numbers for any color.ws.Cells(ws.Rows.Count, 1).End(xlUp).Row– A classic VBA trick to find the last row with data in column A.- The final
.Borders.LineStyleline draws a border around your entire data range.
This single macro eliminates a 15–20 minute manual task. I’ve used variations of this for clients in finance and HR – it’s one of the most immediately useful scripts you’ll write.
Example 2: Copy Data Between Sheets
The Scenario: Every month you copy specific rows from “Raw Data” to “Summary.” You always manually filter, copy, and paste. With VBA, it’s a sub-second operation.
Sub CopyToSummary()
    Dim sourceSheet As Worksheet
    Dim destSheet As Worksheet
    Dim lastRow As Long

    Set sourceSheet = ThisWorkbook.Sheets("Raw Data")
    Set destSheet = ThisWorkbook.Sheets("Summary")

    ' Find the last row on the source sheet
    lastRow = sourceSheet.Cells(sourceSheet.Rows.Count, 1).End(xlUp).Row

    ' Clear the destination sheet first
    destSheet.Cells.ClearContents

    ' Copy the entire data range (including header) to Summary
    sourceSheet.Range("A1:E" & lastRow).Copy _
        Destination:=destSheet.Range("A1")

    ' Optional: Auto-fit columns on the summary sheet
    destSheet.Cells.EntireColumn.AutoFit

    MsgBox "Data copied to Summary sheet successfully!", vbInformation
End Sub
Line-by-Line Explanation:
ThisWorkbook.Sheets("Raw Data")– References a specific sheet by name. If your sheet is named differently, just change the text inside the quotes.destSheet.Cells.ClearContents– Wipes existing data from Summary before pasting new data. Prevents duplicates stacking up.sourceSheet.Range("A1:E" & lastRow)– Copies columns A through E, all the way to the last row with data. Change “E” to whatever your last column letter is..Copy Destination:=destSheet.Range("A1")– Copies directly to A1 of the Summary sheet, no clipboard needed.
Example 3: Auto-Sort a Data Range
The Scenario: Your team’s tracker needs to be sorted by “Due Date” every morning. Someone always forgets. Here’s a macro that sorts any data range with a button click.
Sub AutoSortByDueDate()
    Dim ws As Worksheet
    Set ws = ActiveSheet

    Dim lastRow As Long
    lastRow = ws.Cells(ws.Rows.Count, 1).End(xlUp).Row

    ' Sort by column C (Due Date), ascending
    ws.Sort.SortFields.Clear
    ws.Sort.SortFields.Add _
        Key:=ws.Range("C2:C" & lastRow), _
        SortOn:=xlSortOnValues, _
        Order:=xlAscending, _
        DataOption:=xlSortNormal

    With ws.Sort
        .SetRange ws.Range("A1:F" & lastRow)  ' Adjust F to your last column
        .Header = xlYes
        .MatchCase = False
        .Orientation = xlTopToBottom
        .Apply
    End With

    MsgBox "Data sorted by Due Date!", vbInformation
End Sub
Line-by-Line Explanation:
ws.Sort.SortFields.Clear– Clears any previous sort instructions before applying a new one.Key:=ws.Range("C2:C" & lastRow)– Tells VBA which column to sort by. Here, column C is our “Due Date” column. Change the letter to match yours.Order:=xlAscending– Sorts earliest to latest. Swap withxlDescendingto reverse it..SetRange ws.Range("A1:F" & lastRow)– Defines the full data range to sort, including headers. Adjust “F” to your actual last column..Header = xlYes– Tells VBA that row 1 is a header row so it doesn’t get sorted into the data.
Example 4: Delete Blank Rows Instantly
The Scenario: Exported data almost always includes random blank rows. Deleting them manually is tedious, especially in a 2,000-row file.
Sub DeleteBlankRows()
    Application.ScreenUpdating = False

    Dim ws As Worksheet
    Set ws = ActiveSheet

    Dim lastRow As Long
    lastRow = ws.Cells(ws.Rows.Count, 1).End(xlUp).Row

    ' Loop backwards through rows (always loop backwards when deleting)
    Dim i As Long
    For i = lastRow To 1 Step -1
        If ws.Cells(i, 1).Value = "" Then
            ws.Rows(i).Delete
        End If
    Next i

    Application.ScreenUpdating = True
    MsgBox "Blank rows removed!", vbInformation
End Sub
Line-by-Line Explanation:
For i = lastRow To 1 Step -1– This loops backwards from the last row to row 1. This is critical. If you loop forward and delete a row, the row numbers shift down and you skip rows. Always loop backwards when deleting.If ws.Cells(i, 1).Value = ""– Checks if column A in that row is empty. If yes, the whole row gets deleted.ws.Rows(i).Delete– Deletes the entire row.
Example 5: Merge Multiple Sheets into One
The Scenario: You have 12 monthly sales sheets in one workbook. Every quarter, you need them all in one master sheet. This macro does it automatically.
Sub MergeAllSheets()
    Application.ScreenUpdating = False

    Dim masterSheet As Worksheet
    Dim ws As Worksheet
    Dim lastRow As Long
    Dim masterLastRow As Long

    ' Create or clear a sheet named "Master"
    On Error Resume Next
    Set masterSheet = ThisWorkbook.Sheets("Master")
    On Error GoTo 0

    If masterSheet Is Nothing Then
        Set masterSheet = ThisWorkbook.Sheets.Add(After:=ThisWorkbook.Sheets(ThisWorkbook.Sheets.Count))
        masterSheet.Name = "Master"
    Else
        masterSheet.Cells.ClearContents
    End If

    Dim firstSheet As Boolean
    firstSheet = True

    ' Loop through every sheet except Master
    For Each ws In ThisWorkbook.Worksheets
        If ws.Name <> "Master" Then
            lastRow = ws.Cells(ws.Rows.Count, 1).End(xlUp).Row
            masterLastRow = masterSheet.Cells(masterSheet.Rows.Count, 1).End(xlUp).Row

            If firstSheet Then
                ' Copy with headers for the first sheet
                ws.Range("A1:F" & lastRow).Copy masterSheet.Range("A1")
                firstSheet = False
            Else
                ' Skip header row for all subsequent sheets
                ws.Range("A2:F" & lastRow).Copy masterSheet.Cells(masterLastRow + 1, 1)
            End If
        End If
    Next ws

    Application.ScreenUpdating = True
    MsgBox "All sheets merged into Master!", vbInformation
End Sub
Line-by-Line Explanation:
On Error Resume Nexttemporarily suppresses errors so the code can check if “Master” already exists without crashing.- The
If masterSheet Is Nothingblock creates a new “Master” sheet if it doesn’t exist, or clears it if it does. For Each ws In ThisWorkbook.Worksheets– Loops through every worksheet in the workbook.If ws.Name <> "Master"– Skips the Master sheet itself so it doesn’t copy from itself.firstSheet = True/False– Copies the header row only once (from the first sheet). Every other sheet pastes data only, starting below the existing content.
Example 6: Generate a PDF Report with One Click
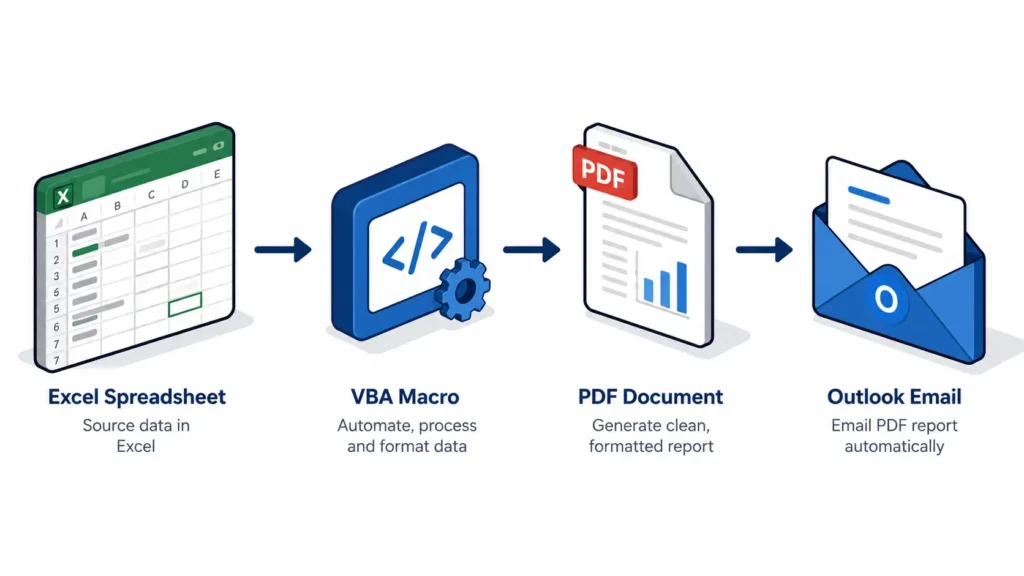
The Scenario: Every Friday you need to export the “Dashboard” sheet as a PDF and save it to a shared folder. This macro does that in two seconds.
Sub ExportAsPDF()
    Dim ws As Worksheet
    Set ws = ThisWorkbook.Sheets("Dashboard")

    Dim savePath As String
    savePath = "C:\Reports\Weekly_Sales_" & Format(Now(), "YYYY-MM-DD") & ".pdf"

    ' Export the sheet to PDF
    ws.ExportAsFixedFormat _
        Type:=xlTypePDF, _
        Filename:=savePath, _
        Quality:=xlQualityStandard, _
        IncludeDocProperties:=True, _
        IgnorePrintAreas:=False, _
        OpenAfterPublish:=False

    MsgBox "PDF saved to: " & savePath, vbInformation
End Sub
Line-by-Line Explanation:
Format(Now(), "YYYY-MM-DD")– Appends today’s date to the filename automatically. Each PDF file gets a unique name.ws.ExportAsFixedFormat– Excel’s built-in method for saving as PDF. It works without needing Adobe Acrobat.Type:=xlTypePDF– Tells it to save as PDF (as opposed to XPS, another fixed format).IgnorePrintAreas:=False– Respects any print area you’ve set on the sheet.OpenAfterPublish:=False– Saves quietly without opening the PDF. Set toTrueif you want it to pop open immediately.- Change the
savePathto your actual folder. Or useApplication.GetSaveAsFilenameto let users pick a location at runtime.
Example 7: Send an Automated Email via Outlook
The Scenario: After generating your weekly report, you need to email it to your manager. This macro drafts the email in Outlook, ready for you to review and send.
⚠️ Requirement: This example requires Microsoft Outlook installed and running on the same computer as Excel.
Sub SendReportEmail()
    Dim OutApp As Object
    Dim OutMail As Object

    ' Create an Outlook application instance
    Set OutApp = CreateObject("Outlook.Application")
    Set OutMail = OutApp.CreateItem(0)  ' 0 = Mail item

    Dim attachPath As String
    attachPath = "C:\Reports\Weekly_Sales_" & Format(Now(), "YYYY-MM-DD") & ".pdf"

    With OutMail
        .To = "manager@yourcompany.com"
        .CC = "team@yourcompany.com"
        .Subject = "Weekly Sales Report - " & Format(Now(), "MMMM DD, YYYY")
        .Body = "Hi Team," & vbNewLine & vbNewLine & _
                "Please find attached the weekly sales report." & vbNewLine & vbNewLine & _
                "Best," & vbNewLine & "Your Name"
        .Attachments.Add attachPath  ' Attach the PDF
        .Display  ' Opens the email for review before sending
        ' Use .Send instead of .Display to send automatically without review
    End With

    Set OutMail = Nothing
    Set OutApp = Nothing
End Sub
Line-by-Line Explanation:
CreateObject("Outlook.Application")– Launches Outlook in the background so VBA can control it.OutApp.CreateItem(0)– Creates a new email item. The0is the constant for a mail item (as opposed to calendar invites, tasks, etc.).vbNewLine– Inserts a line break inside the email body string..Display– Shows the composed email to you so you can review it before hitting Send. This is the safe option..Send– Sends without showing you first. Only use this once you’re 100% confident in the email content and recipient.Set OutMail = Nothing– Cleans up the Outlook object from memory when done.
You can combine this with Example 6 – export the PDF first, then immediately run this macro to email it.
Example 8: Auto-Run Code When a Workbook Opens
The Scenario: Your team opens a shared tracker every morning. You want it to automatically refresh data, show a welcome message, or jump to a specific sheet – without anyone having to click anything.
' This code goes in the ThisWorkbook module, NOT a standard module
Private Sub Workbook_Open()
    ' Jump to the Dashboard sheet automatically
    ThisWorkbook.Sheets("Dashboard").Activate
    Range("A1").Select

    ' Show a welcome message with today's date
    MsgBox "Good morning! Today is " & Format(Now(), "MMMM DD, YYYY") & _
           ". Data was last refreshed: " & _
           ThisWorkbook.Sheets("Log").Range("B2").Value, vbInformation, "Welcome"

    ' Refresh all data connections (if you use Power Query)
    ' ThisWorkbook.RefreshAll
End Sub
Line-by-Line Explanation:
Private Sub Workbook_Open()– This is a special event procedure. Excel runs it automatically every time the workbook is opened. Important: This code must go in theThisWorkbookmodule in the VBA editor, not a regular module.ThisWorkbook.Sheets("Dashboard").Activate– Jumps to the Dashboard tab on open.Format(Now(), "MMMM DD, YYYY")– Displays today’s date in a readable format like “May 15, 2026.”ThisWorkbook.Sheets("Log").Range("B2").Value– Pulls a value from a specific cell (like a “last refreshed” timestamp) to show in the message.ThisWorkbook.RefreshAll– If uncommented, this refreshes all Power Query connections automatically on open.
For a full breakdown of event-driven automation patterns, see our guide on auto-running VBA code on workbook open.
Example 9: Create a Summary Sheet from Multiple Tabs
The Scenario: You have separate sheets for each region (Northeast, Southeast, Midwest, West). You need a summary sheet that pulls the total sales figure from cell D2 of each region tab.
Sub CreateRegionalSummary()
    Application.ScreenUpdating = False

    Dim summarySheet As Worksheet
    Dim ws As Worksheet
    Dim rowNum As Long

    ' Create or clear the Summary sheet
    On Error Resume Next
    Set summarySheet = ThisWorkbook.Sheets("Regional Summary")
    On Error GoTo 0

    If summarySheet Is Nothing Then
        Set summarySheet = ThisWorkbook.Sheets.Add(After:=ThisWorkbook.Sheets(ThisWorkbook.Sheets.Count))
        summarySheet.Name = "Regional Summary"
    Else
        summarySheet.Cells.ClearContents
    End If

    ' Add headers
    summarySheet.Range("A1").Value = "Region"
    summarySheet.Range("B1").Value = "Total Sales"
    summarySheet.Range("A1:B1").Font.Bold = True

    rowNum = 2

    ' Loop through all sheets except the Summary sheet itself
    For Each ws In ThisWorkbook.Worksheets
        If ws.Name <> "Regional Summary" Then
            summarySheet.Cells(rowNum, 1).Value = ws.Name
            summarySheet.Cells(rowNum, 2).Value = ws.Range("D2").Value
            rowNum = rowNum + 1
        End If
    Next ws

    ' Format the B column as currency
    summarySheet.Range("B2:B" & rowNum - 1).NumberFormat = "$#,##0.00"
    summarySheet.Columns("A:B").AutoFit

    Application.ScreenUpdating = True
    MsgBox "Regional Summary created!", vbInformation
End Sub
Line-by-Line Explanation:
- This macro creates a new “Regional Summary” sheet (or clears it if it already exists).
- It writes “Region” and “Total Sales” as headers in row 1.
For Each ws In ThisWorkbook.Worksheets– Loops through every tab.ws.Range("D2").Value– Grabs whatever is in cell D2 of each tab. Change this to match where your totals live.rowNum = rowNum + 1– Moves down one row after writing each region’s data.NumberFormat = "$#,##0.00"– Formats the totals as US currency.
Example 10: Highlight Overdue Items Automatically
The Scenario: You manage a project tracker. Any task where the due date has passed and the status is still “Open” needs to stand out. This macro highlights those rows in red.
Sub HighlightOverdueTasks()
    Application.ScreenUpdating = False

    Dim ws As Worksheet
    Set ws = ActiveSheet

    Dim lastRow As Long
    lastRow = ws.Cells(ws.Rows.Count, 1).End(xlUp).Row

    Dim i As Long
    For i = 2 To lastRow  ' Start at row 2 to skip header
        Dim dueDate As Date
        Dim status As String

        ' Assume Due Date is in column C, Status is in column D
        If ws.Cells(i, 3).Value <> "" And ws.Cells(i, 4).Value <> "" Then
            dueDate = ws.Cells(i, 3).Value
            status = ws.Cells(i, 4).Value

            If dueDate < Date And status = "Open" Then
                ws.Rows(i).Interior.Color = RGB(255, 102, 102)  ' Red highlight
                ws.Rows(i).Font.Bold = True
            Else
                ws.Rows(i).Interior.ColorIndex = xlNone  ' Clear highlight
                ws.Rows(i).Font.Bold = False
            End If
        End If
    Next i

    Application.ScreenUpdating = True
    MsgBox "Overdue items highlighted!", vbInformation
End Sub
Line-by-Line Explanation:
For i = 2 To lastRow– Starts on row 2 to skip the header row.ws.Cells(i, 3).Value– Reads column C (the 3rd column) in row i. Change3and4to match your column numbers.If dueDate < Date– Compares the task’s due date against today’s date.Dateis a VBA keyword that returns today.And status = "Open"– Only highlights if the task is still open. Completed tasks won’t get flagged.RGB(255, 102, 102)– A softer red. Much better than purevbRedfor professional reports.xlNone– Clears any previous highlighting from rows that no longer qualify.
Best Practices for Running VBA Safely

Now that you have 10 automation examples in your toolkit, let’s talk about running them safely. I’ve watched people lose data by running macros on live files without a backup. Don’t be that person.
Always Test on a Copy First
Before running any new macro on a real file, duplicate the workbook and test there. Go to File → Save As and add “_TEST” to the filename. Run your macro. Verify everything looks right. Then run it on the real file.
Use Application.ScreenUpdating = False … and Set It Back
Every macro that modifies data should start with Application.ScreenUpdating = False and end with Application.ScreenUpdating = True. This prevents screen flicker and speeds up execution. If your macro crashes mid-run without resetting this, Excel can freeze visually. Add the reset in an error handler too.
Add Error Handling to Production Macros
For macros you run regularly, wrap the core code in an error handler:
Sub SafeMacroExample()
    On Error GoTo ErrorHandler

    ' Your main code here
    Application.ScreenUpdating = False
    ' ... do stuff ...
    Application.ScreenUpdating = True
    Exit Sub

ErrorHandler:
    Application.ScreenUpdating = True
    MsgBox "Something went wrong: " & Err.Description, vbCritical
End Sub
On Error GoTo ErrorHandler– Redirects execution to theErrorHandlerlabel if anything fails.Err.Description– Gives a plain-English description of what went wrong.- The
Application.ScreenUpdating = Truein the error handler ensures Excel doesn’t stay frozen if the macro fails.
Never Skip the .xlsm Save Format
If you save your macro-enabled workbook as .xlsx, every single macro is deleted permanently. Always save as .xlsm. Excel will prompt you when you try to save in the wrong format – don’t click through that warning without reading it.
Understand Macro Security Settings
Excel disables macros by default for security. To enable them: File → Options → Trust Center → Trust Center Settings → Macro Settings → Enable all macros (for personal files) or use Trusted Locations. Never enable macros from files you received from unknown senders.
For a comparison of VBA with Microsoft’s newer Office Scripts (better for shared cloud workbooks), see our VBA vs Office Scripts comparison.
Quick Reference: VBA Best Practices Table
| Practice | Why It Matters |
|---|---|
| Test on a copy | Prevents irreversible data loss |
Use ScreenUpdating = False | Faster execution, cleaner user experience |
| Add error handling | Prevents silent failures and frozen Excel |
Save as .xlsm | Preserves your macros between sessions |
| Use Trusted Locations | Keeps macros enabled without disabling all security |
Use Option Explicit at top of module | Forces variable declarations, prevents typo bugs |
FAQs About Excel VBA Automation
Not as hard as people think. If you can write Excel formulas, you already understand the concept
of telling Excel what to do. VBA just lets you chain instructions together and run them
automatically. Most beginners write their first useful macro within a week of starting. The
biggest hurdle is usually knowing where to put the code — once you understand the VBA editor,
everything else follows.
Start by identifying the task you repeat most. Then record a macro of yourself doing it manually
(Developer tab → Record Macro). Play back the recording, then open the VBA editor to read
what Excel wrote. That generated code is your starting point. From there, you can modify it, add
loops, or combine it with other examples from this post
Yes, using Microsoft Outlook. Example 7 in this post shows the exact code to draft an email with
an attachment. The macro requires Outlook to be installed on the same Windows machine as
Excel. For cloud-based or scheduled email sending, look into Power Automate as a complement
to VBA
Use a For Each loop to iterate through every sheet in the workbook, then copy specific ranges
from each to a master sheet. Example 5 in this post (Merge Multiple Sheets) shows exactly how
this works, including how to handle headers correctly so they only appear once
Most basic VBA automation works on Mac (Excel for Mac 2016 and later), but there are
limitations. The Outlook email example and some Windows-specific filesystem paths won’t work
on Mac. If your team works cross-platform, consider whether Office Scripts (cloud-based, works in Excel for the web) is a better long-term option for shared workbooks.
What to Learn Next
You just picked up 10 practical Excel VBA automation examples – enough to shave hours off your workweek starting today. The scripts in this post cover the most common pain points in real American offices: messy data, manual reports, forgotten emails, and the never-ending copy-paste grind.
Here’s my suggestion for where to go from here:
- Pick one example that matches a task you currently do manually
- Create a test copy of your workbook
- Paste the code, adjust the sheet names and column references for your data
- Run it and see the time savings firsthand
Once you’ve run your first real automation macro, the mindset shift happens. You start looking at every repetitive task and asking: “Can VBA handle this?” The answer is almost always yes.
If you want to build on this foundation with structured lessons, check out our free Advanced VBA Course – it picks up exactly where this post leaves off.
And if you found these examples useful, bookmark exceltutorial.org – we publish practical Excel guides like this regularly.
Written by Jitendra Rao – Microsoft Excel Trainer with 11+ years of hands-on experience. Founder of exceltutorial.org. Specializes in Excel automation, Power BI, and data analytics training.
References: Microsoft VBA Documentation | Microsoft Excel Support – Enable Macros


